Casually Crafting Blog Hop - January 2023
I'm back with another casual card for the Casually Crafting Blog Hop. We're a group of Stampin' Up! Demonstrators that love to stamp and love to share. We share card and projects that are simple and easy to create with a few products and are perfect for the beginner and casual stamper. Our blog hop goes live on the third Saturday of each month. I hope you'll join us and "hop" around our group to be inspired!
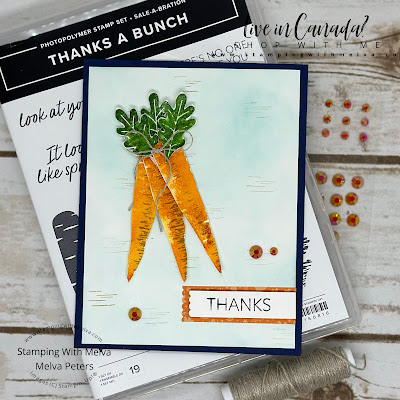
This month we are sharing our favourites from Sale-a-Bration. Have you seen the adorable Thanks A Bunch Stampset? These carrots are so much fun! This stamp set can be yours for free with a $60 order in Canada during Sale-a-Bration starting on January 5th.
I used Watercolor Paper to stamp the carrots and tops using Pumpkin Pie Ink and Garden Green Ink. For this card I inked up the stamp and then spritzed with water before stamping. Love how rich and vibrant the colour is. Look good enough to eat! The carrots are fussy cut before adhering the bunch to the card base.
Instructions
- Cut Night of Navy cardstock 4 1/4" x 11" and score at 5 1/2". Fold and burnish on scoreline using Bone Folder to form card base.
- Cut Basic White cardstock 4" x 5 1/4"
- Use Pool Party ink with Blending Brush to add colour
- Stamp lines randomly on Basic White cardstock using Crumb Cake ink
- Adhere to card base
- Stamp carrot three times on Watercolour Paper using Pumpkin Pie ink - ink up stamp and spritz with water before stamping
- Stamp lines on carrots using Crumb Cake ink
- Stamp 3 leaves on Watercolour Paper using Garden Green ink - ink up stamp and spritz with water before stamping
- Fussy cut leaves and carrots using Paper Snips
- Adhere the carrots together to form bunch and adhere the leaves on the top
- Adhere to card base using Dimensionals.
- Tie a bow using Linen Thread and adhere to top of carrots using Glue Dot.
- Cut Basic White cardstock 1/2" x 2"
- Stamp sentiment using Tuxedo Black Memento ink
- Punch end using Happy Labels punch
- Cut Pumpkin Pie Designer Series Paper 3/4" x 2 1/4"
- Punch end using Happy Labels punch
- Adhere stamped label to Pumpkin Pie label
- Adhere to card base in bottom right corner
- Cut Basic White cardstock 4" x 5 1/4"
- Stamp sentiment using Tuxedo Black Memento ink
- Cut Designer Series Paper 3/4" x 4"
- Adhere to bottom of Basic White cardstock
- Adhere to inside of card
- Adhere Iridescent Pastel Gems.
You can find all of the supplies for this card in my Online Store.
Check out my Youtube Video for tips and tricks to make this card. Don't forget to subscribe to my Stamping with Melva YouTube Channel!
Now it's time to be inspired by all of the Projects in our Blog Hop!
I hope we have inspired you!
Shopping with Me!
Use the following links to PDF copies of the catalogues:
Click here to request a catalogue.
Please be sure to use the current Host Code EWMTENSQ to receive a free gift from me. When you place a $50 order (before shipping and taxes) using the Host Code, I'll send you a Thank You card by mail and a FREE tutorial by email as a thank you. If your order is over $200, please do not use the Hostess Code as you'll qualify for Stampin' Rewards, but I'll still send you the Thank You card and tutorial!
You can also purchase this tutorial with 13 "Fancy Fold" Themed tutorials for $20! Check them out in my Square Store!

Here's my Portrait Double Z Fold card that is included in the tutorial.
Monthly Card Club
I'm excited to be offering a Monthly Card Club either In Person or by mail. Each month I will select a stamp set or bundle to feature. You will make 3 cards with envelopes and receive 1/2 package of Designer Series Paper, package of Embellishments and a roll of ribbon. Cost is $45 In Person (or local pick up) and $50 mailed.
You can join my club monthly. If you join for 6 consecutive months and get a swag bag valued at $25 from me as a gift.
The In Person classes will be held on the last Sunday of each month from 10am to 12noon or 1-3pm. Space will be limited to 3 people per class and masks will be mandatory (as well as any other requirements announced by the Provincial Health Officer).
Registration is now open for the February Club featuring Rain or Shine - this is a new suite from the January to April Mini Catalogue. Registration closes February 12th. Sneak peeks coming soon!
Your Creativity Awaits
The January Kit features Queen Bee - this is an amazing bundle from the January to April Mini Catalogue!
Do you love to craft and are you looking for a kit that ships directly to you each month with special perks each month? Then you will LOVE “YOUR CREATIVITY AWAITS”!
With “Your Creativity Awaits”, each month you will receive an exclusive make and take kit (2 cards of 4 designs) plus a PDF Tutorial. All for only $60 per month shipped directly to you or $56 local pick up.
After 6 consecutive months of membership, you will receive a thank you of $25 product credit (before shipping and taxes) to spend on whatever you choose!
Each month, the Design Team will choose one stamp set or bundle and design fun projects for you to create. The stamp set is included in your kit. If you don't already own the dies or punch, you may add it to your kit or use what you have.
- Featured stamp set - Queen Bee
- 8 Cards (2 each of 4 different designs) - designed by Your Creativity Awaits Team
- Exclusive Project tutorials you can follow along with to create your cards
- Extra product (value will depend on the price of the stamp set)
- Shipped: $60 monthly
- Porch Pick-up: $56 monthly
- Add on Queen Bee Dies for $33 more (total is $93 mailed or $89 local pick up)
Your Creativity Awaits Kit Timelines
- The upcoming kit information including supplies needed will be announced by the 15th of the previous month
- Sign up must be done by the 2nd Sunday of the month
- Kits will be shipped and tutorials emailed out by the 4th Tuesday of the month (subject to unforeseen delays in the shipment of product from Stampin’ Up!)
- Available to Canadian Residents Only
- Visit my Online Store here
- Shop the Clearance Rack here
- Earn FREE Stampin' Up! Products - Join my Rewards Program
- Join my Team here
- Check out my Tutorials for Sale
- Check out my Upcoming Events
- Buy Retired Stampin' Up! Products (Canadian Residents Only)
- Subscribe to Paper Pumpkin
- Your Creativity Awaits - February 2023 (featuring Queen Bee)
- Monthly Card Club - February 2023 (Rain or Shine)
- 2023 Jan to Apr Mini Catalogue Launch - January 21, 2023
- Register for the Creativity Abounds By the Bay Stamp Camp - Feb 10-11, 2023


.jpg)
.jpg)

.png)
.jpg)


Very cute card Melva.
ReplyDeleteLove these carrots with the blended background.
ReplyDelete